How to teach a child to hold a pen and pencil correctly - 8 ways
Mothers know how difficult it is to teach a child to hold a hand correctly. It’s worth thinking about this before you start getting your child ready for school. From early childhood there is a risk of teaching him to do it incorrectly, and then the habit can remain for life. And the problem is not only in handwriting, and not even in which hand he learns to write - left or right. This process can look very strange when an adult holds the pen somewhat awkwardly, as if with a claw. There are several effective ways to teach your child to write in a playful way; you can choose any one that you like and will interest your child.
A pen or pencil should be placed on the upper phalanx of the middle finger, secured on top with the thumb and on the side with the index finger. The ring finger and little finger should be curled inside the palm or towards the base of the thumb. Grab the handle so that its lower end is one and a half centimeters free, and the handle itself is tilted towards the shoulder. The index finger should be relaxed, lying freely and at ease, otherwise the hand will quickly get tired.
The writing tool itself should be chosen as simple as possible: about 15 cm long, not thick, without many edges that complicate the writing process. Long souvenir or promotional pens are very inconvenient for learning to write.
1. Tweezer method
To do this, you need to take a pencil or pen by the very tip with three fingers (thumb, index and middle) and place it on the table, resting it on the surface of the paper. We smoothly move our fingers down, sliding them along the pencil. They themselves will take the correct position, gently squeezing the pencil (pen).
2. Put the pen to sleep
Show with your own example how you can put a pen to sleep. Let's imagine that the middle finger is a crib. Let's put the handle on the "bed". Under the “head” (end of the handle) you need to place the pad of your index finger – a “pillow”. Cover the handle with a “blanket” - the pad of your thumb. Now we can safely begin to write. When writing, the hand rests on the little finger bent inward.
3. Using a napkin
We will need a regular napkin. It needs to be divided in half, otherwise it will be too big for a child's hand. We pinch half of the napkin between the ring finger, little finger and palm. We ask the child to take the pencil with the remaining three fingers so as not to let go of the napkin from his palm. Miraculously, the baby will hold the pencil correctly while the napkin is held between his fingers.
4. Educational attachment
Modern stationery manufacturers have invented special attachments for pens and pencils. They are made in the form of various cheerful and colorful animals, birds, and fish. Such attachments have holes for fingers and it is simply impossible to grasp the handle with the attachment incorrectly. These attachments are available for both right-handers and left-handers, and there is also a separate attachment for cutlery (spoons, forks. By the way, read the article on how to teach a child to hold a spoon).
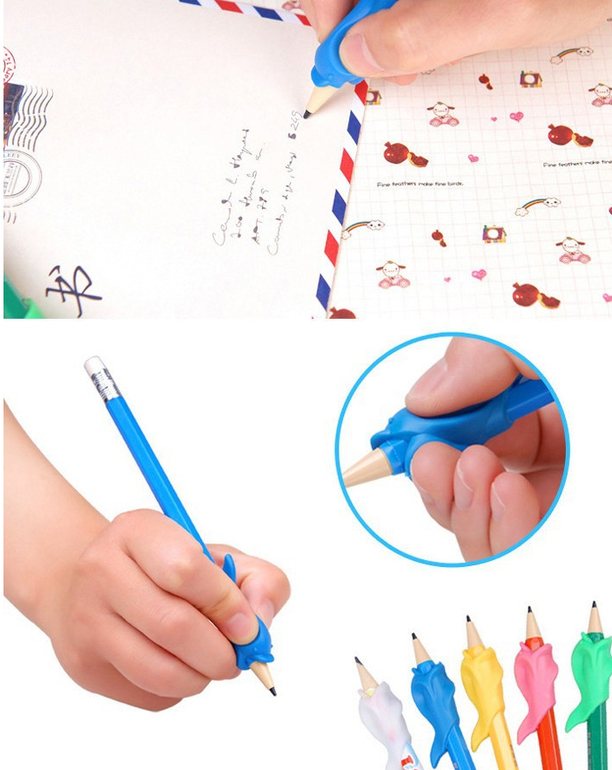
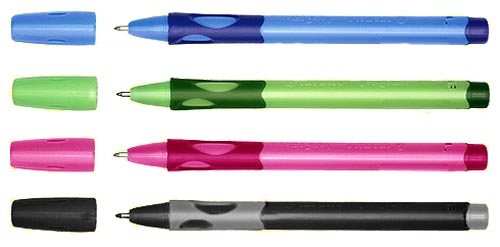
5. Stabilо LeftRight training pen with a “tip” for fingers
Training pens have also been developed for children. They have a triangular shape, special grooves for fingers and greatly facilitate the writing process. The weight of these pens is slightly less than regular ones. Manufacturers did not forget about bright colors and colorful designs, so that the student would not be bored when writing with such a pen.
6. Using crayons
Teaching a child to draw usually begins with crayons. If you take pastel crayons and break them into pieces about 3 cm long, and then invite your child to draw with them, this will give just the desired effect. Short pieces cannot be grasped with a fist, so the baby will gradually learn to grasp the chalk with three fingers, as we need, and in the future he will not have problems getting acquainted with the pen.
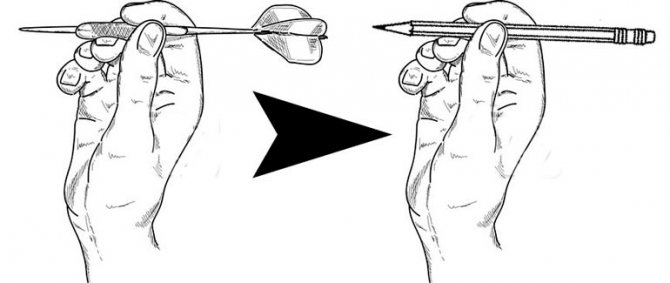
7. Playing darts
When your child plays dart throwing, it also helps develop writing skills. The position of the fingers on the dart is exactly the same as it should be on a pen or pencil. You just need to invite him to imagine that the pen is a dart, then smoothly lower it towards the “target” - the paper.
8. Point on the finger
The easiest way is to put a bright dot on the upper phalanx of the middle finger. Explain to your child that you have marked the place where the pen should lie. The same mark, but in the form of a line, can be left on the lower end of a pen or pencil. Tell your child that the finger should not fall below this line.
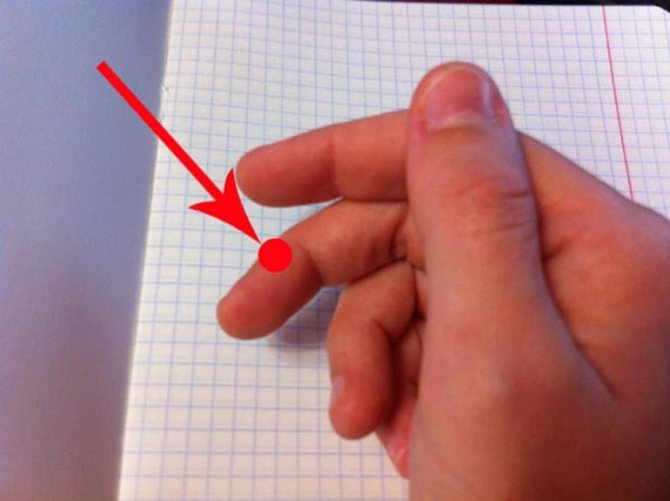
We place the pen on this pad
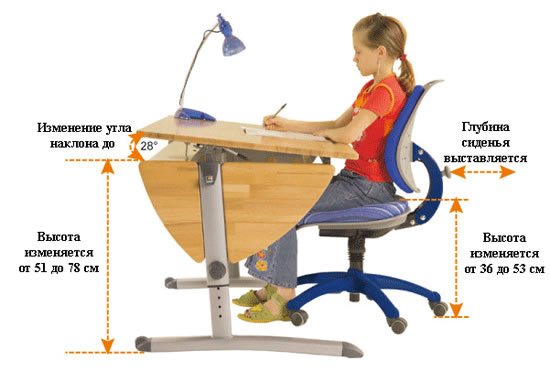
When writing, it is important to follow the following rules:
- sit at the table with a straight back;
- place your feet together on the floor or stand;
- both elbows should be on the table;
- the distance between the edge of the table and the chest is about 2 cm;
- the sheet of paper should be positioned at an angle of 30 degrees so that the lower left corner is oriented toward the middle of the chest.
Teaching a child to hold a pen correctly is not enough. To develop handwriting and coordinate writing, you need to do simple exercises that will become a kind of fun for him:
- cut out figures from paper using scissors;
- string beads on a thread;
- sculpt from plasticine, dough;
- tie knots on threads and ropes of various thicknesses;
- decorate drawings with a brush, pencils, felt-tip pens;
- draw by cells;
- trace the shapes along the contour;
- do finger gymnastics (repeat the movements of adults while reading rhymes).
Chapter from the book by M. Bezrukikh “How to teach a child to write beautifully”
We all write without thinking much about how we hold it. I will show this with the help of pictures using the example of a fountain pen. In Russian schools, children are now taught to write with ballpoint pens. You can use the same method for a fountain pen.
1. Imagine that there is a “pad” on the middle finger of the right hand:
2. Place the handle on this “pad”:
3. The index finger and thumb grab the handle from above:
The distance from the very tip of the pen to the tip of the index finger (distance X in the figure) should be approximately 15 mm. If the distance is too small or too large, your hand will become strained when writing.
When we write, we follow the following rules:
We sit straight. Feet together. The distance between the chest and the table is 1.5 - 2 cm. The notebook is located at an angle of 30 degrees. If the notebook is positioned differently, the child will have to turn his torso and tilt his head strongly. The lower left corner of the sheet on which the child writes should correspond to the middle of the chest. Both elbows are on the table.
In my class, we memorized a little rhyme that we repeated every time before we started writing. It may sound a little unattractive to the ear, but it helps you remember the rules of landing and protects you from curvature of the spine:
“Sit up straight, legs together, take a notebook at an angle. The left hand is in place, the right hand is in place, you can start writing.”
Parents need to spend only 20 minutes a day on these simple exercises, so that in the future their children write beautifully and quickly and do more in school (On the topic: Is it necessary to teach a child to write before school?). And you need to teach your child how to hold a pen correctly as early as possible, so that later you don’t have to re-teach it, getting rid of incorrect habits.
Two easy ways to teach your child to hold a pen correctly will help you avoid many problems. This is especially true for first-graders and children. who are just learning to write:
A child will become an excellent student if he writes beautifully:
Hello girls! Today I will tell you how I managed to get in shape, lose 20 kilograms, and finally get rid of the terrible complexes of fat people. I hope you find the information useful!
Do you want to be the first to read our materials? Subscribe to our telegram channel
Source: razvitie-krohi.ru
How to hold a pen or pencil
The correct grip of a pen or pencil will determine the baby’s handwriting and how quickly the hand will get tired while writing or drawing. The faster the baby gets tired, the less interesting the activity will be for him. The free movement of his hand and the position of his fingers will enable him to carry out written tasks or drawings with ease, and will also give his creations neatness and precision. In the future, this will help you develop beautiful and understandable handwriting.
The correct girth looks like this:
- On the first phalanx of the middle finger, closer to the fold with the second phalanx, place the tip of a pencil at a distance of about one and a half centimeters from the lead.
- The thumb and index finger secure the pencil lead, squeezing it on the sides so that it does not slip.
- The ring finger and little finger are bent inside the palm towards the thumb, while they are not compressed, but slightly relaxed.
Important!
It is necessary to explain to the child that the fingers should not be too tense, and the hand should not be strained.
There are several simple techniques for learning how to grip correctly:
- using crayons;
- playing darts;
- the pen goes to “sleep”;
- assistant nozzle.
Teaching children to hold a pen correctly when writing: 8 simple ways and some useful tips
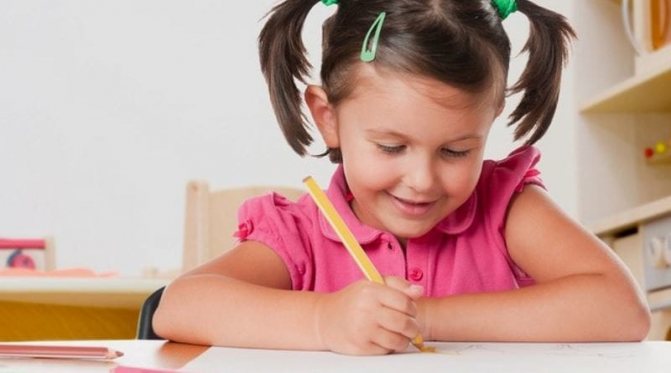
If you give a four-year-old child a pencil, he will probably take it in his fist. Although in this age period this way of grasping writing utensils is considered a relative norm, it is worth thinking about how to teach a child to hold a pen correctly.
An incorrect habit will certainly affect writing and handwriting and even academic performance, since incorrect grip leads to rapid fatigue, inconvenience and reluctance to work in a notebook.
And yet, it is possible to teach a child to write correctly, since there are several effective methods, one of which will definitely appeal to the future student.
Have you ever wondered whether you are picking up a pencil correctly or incorrectly? In adults, this happens “automatically,” but a child still does not understand at all how to hold a pen correctly.
If the child is right-handed, the writing instrument should be located on the left side of the middle finger. The index finger presses the handle, preventing it from slipping. The largest finger holds it on the left side. For a left-handed baby, the holding method is, accordingly, absolutely mirror-like.
To check the correct grip of the writing utensils, ask the child to slightly raise his index finger. If the pencil falls out of the palm, it means that the children's fingers are positioned incorrectly.
The baby is free to use the remaining “idle” fingers as he wishes. Usually the little finger and ring finger are pressed against the palm; some people hide them closer to the thumb when writing.
To prevent gripping a pencil from causing inconvenience, you need to teach your child to perform the following simple steps:
- First of all, explain to the future student that writing utensils are held in the palm not vertically, but at such an angle that the upper tip “looks” at the shoulder.
- The upper phalanx of the middle fingers is where the pencil is placed. The index finger should support it on the upper side, and the thumb on the left. The remaining fingers are pressed against the palm.
- When placing your hand on the table surface, it is important to determine the correct fulcrum. It serves as the third phalanx of the little finger and the outer side of the palm.
- To prevent the muscles from straining too much, you should not squeeze the pencil excessively - your fingers should be relaxed. And the distance from the finger grip to the end of the rod is approximately 1.5-2 centimeters.
If your child constantly ignores these recommendations, be sure to remind them, but do not say the word “wrong.” Better show how to do it and hold it.
Today, there are several methods, algorithms and methods that will tell parents how to teach their child to hold a pen correctly. They are distinguished by simplicity, efficiency and versatility. All you have to do is choose the most suitable method and start learning.
Method #1: Pincer grip
If the child keeps putting the pen in the palm of his hand incorrectly, show how the tweezer grip method works.
The exercise looks like this: the child holds a pencil with three main fingers by the upper tip, and with the lower one he places it perpendicular to the table surface. Then the fingers move smoothly downwards until they themselves occupy the ideal position required for writing.
Method No. 2. “Lulling” the handle
If the child is very young, then it is quite possible to play an interesting game with him. Invite your child to imagine that the hand needs to be put to sleep in the “bed”. And to do this, you should place a “pad” under her “head” and cover her with a “blanket” on top.
As you can easily guess, the “bed” is the middle finger, the “pad” is the index finger, and the “bedspread” is the thumb, respectively.
Method No. 3. Using a napkin
For this technique you will need a napkin and a pencil. We fold this accessory several times and invite the child to press it to his palm with his ring finger and little finger. We straighten the remaining “working” fingers and use them to take a writing implement, as we described above. Clamped fingers will no longer “interfere” with proper grip.
Method #4: Darts
It turns out that throwing darts also helps develop writing skills. Therefore, if a child cannot understand the principle of gripping a pencil, try to teach him to play such an exciting and dynamic game as darts.
It is known that holding a dart correctly (with three fingers) significantly increases the likelihood of hitting the bull's eye. So, after teaching your child this game, just remind him every time he sits down to write that a pencil is the same as a dart.
Method No. 5. Special pad
Today's stationery manufacturers offer a variety of training devices that help you quickly master the ability to write. Among them are special attachments for writing utensils, which have grooves for fingers, so it is simply impossible for a child to pick up a pencil incorrectly.
Another advantage of such attachments is the variety of shapes, colors and materials and, of course, the division into simulators for right-handed and left-handed children.
Method No. 6. Using crayons
Another good writing simulator is ordinary pastel crayons, broken into pieces no more than 3 centimeters long. A child simply cannot grasp crayons of this size in his fist, so he will have to grab it only with his fingers.
A child, having learned to draw using this method, will easily switch to other writing instruments.
Method No. 7. Self-taught pen
For children learning to write, special training pens have been developed that have a triangular shape and special grooves for the fingers, which greatly facilitates the writing process.
In addition, the weight of these writing instruments is slightly less than that of ordinary pens and pencils, which also helps the future “scribe”.
Method No. 8. Mark on the finger
This is perhaps the simplest method. You will only need to draw a dot on your finger - where the writing instrument should be located. Exactly the same mark, but, for example, in the form of a dash, you can leave it at a distance of 1.5 cm from the tip of the rod. Explain to your child that the fingers should not fall below this mark.
So, the child has learned to pick up and hold a pencil in the palm of his hand, but this skill alone is not enough to write beautifully and quickly. It is important to train a child’s hand, and this can be done using well-known exercises:
- Finger gymnastics. The development of fine motor skills and the ability to hear an adult - such a skill is extremely important for a future student. Finger exercises are carried out using nursery rhymes and special rhymes.
- Cutting out. Children should start playing with scissors from the age of four, according to safety rules. First you need to cut out well-defined figures, then with visual control without drawing. The cut out parts will be used to make appliqués.
- Drawing. You need to color with completely different supplies - colored pencils, chalk, felt-tip pens, watercolors. This will help build the ability to choose the right pressure.
- Hatching. There are many types of shading - parallel, wavy, circular, etc. It is important to teach your child to draw lines without breaking and maintain a certain interval between them.

The child should know that:
- sit with a straight back;
- feet are on the floor;
- you can’t lean on the table;
- elbows are located on the writing surface;
- The paper sheet is placed at a slope of 30 degrees.
The above recommendations will tell adults how to teach a child to hold a pencil and other writing utensils correctly.
It is only important to remember that you should not drill your baby; on the contrary, you need to turn learning into fun in order to arouse the child’s sincere interest.
Source: adella.ru
How to teach a child to hold a pen correctly? 6 basic methods and some additional tips
The question of how to hold a pen correctly when writing usually arises before parents when their child turns 5 or 6 years old. But experts are convinced that it is necessary to start learning much earlier, so that a first-grader does not have to re-learn in an emergency.
A small child tries to take a pencil in the most comfortable way, most often in a fist. However, the situation is complicated by the fact that such a habit quickly takes root, so the type of holding writing instruments remains for life.
There are several simple techniques that can be used to teach your child to hold a pen or pencil correctly. Moreover, it is necessary to start at a very early age, when the little one takes a rattle, spoon or chalk in his hands for the first time.
The situation when a child incorrectly holds a pen, pencils, or markers while writing is quite common. Where does this problem come from? This habit is formed at a very early age, long before entering school.
It all can start from the period when the child becomes interested in the rattle, holding it in his hand. Then comes the turn of brushes, soft pencils, with which the baby draws scribbles on scrapbook paper.
In addition, the skill of holding writing instruments is developed by working with plasticine or a special test.
Correct pinching and sculpting is done with the right hand, using the thumb, index and middle fingers.
From the age of 4, it is necessary to observe how the child draws. Some kids hold a pencil in their fist. Others squeeze the writing instrument with excessive force.
By the age of 6, children should already be able to use a pencil, even if it is just drawing patterns in copybooks or tracing block letters. Moreover, parents need to constantly monitor the correctness of the letter in order to prevent relearning.
As already noted, incorrect grip of a writing instrument can lead to health problems for a child. The most dangerous undesirable consequences are blurred vision and curvature of the spinal column due to improper sitting at the table.
Even if such unpleasant complications do not arise in the child, he will simply become more tired when writing, shading or drawing. And this can negatively affect school performance and psychological adaptation.
Such troubles can be prevented if incorrect hand position and incorrect grip of the writing implement are detected in time. You can recognize a future school problem by the following signs:
- the baby holds his thumb slightly lower than his index finger when working;
- the pencil is held by the index or ring finger, not the middle one;
- the felt-tip pen is taken with a pinch;
- the fingers are located either too low or too high;
- a child, when drawing a picture, rotates not the pencil, but the album sheet itself;
- the upper end of the pencil is directed not towards the shoulder, but towards the neck;
- The baby presses the paper either with excessive force or too weakly.
The main nuance is the placement of the fingers. A right-handed person takes a writing object in the following way: the pen is placed on the upper part of the middle finger, and the index finger holds the writing instrument on top. The thumb is located on the left.
Left-handed people have a mirror grip: the handle is located on the upper part of the middle finger of the left hand, the index finger holds the object on top, and the thumb on the right side.
There are no special requirements for the remaining fingers. The ring and little fingers can be positioned in any way convenient for the little scribe. Usually they are pressed against the palm.
In order for the child to finally understand how to hold a pencil correctly when writing and drawing, experts recommend reminding the child of the following rules:
- the writing object is placed exactly on the pad of the terminal section of the middle finger;
- all three fingers that are involved in holding the object seem to be rounded;
- the other two fingers are bent and pressed against the palm;
- the entire hand is completely relaxed;
- ideal position - fingers are located above one and a half centimeters from the tip of a pen or pencil;
- In the process of writing letters or drawing, the little finger may touch the surface of the table.
Not all parents know which technique is most effective in teaching children to optimally grip writing accessories. Experts identify several simple methods that are universal (suitable for all children) and effective (work in almost 100% of cases).
Parents just have to choose the most suitable method and begin the learning process.
To teach your baby to properly grasp a writing object in his hand, you need to use a tweezers “grip.” This is one of the simplest and most visual methods of holding pencils.
So that children's fingers can take the correct position, you need to stock up on half a napkin and a pencil in advance. The paper accessory needs to be folded 4 times, after which the baby presses it to the palm of the hand with the little finger and ring finger.
The child straightens the fingers that work when writing and takes a pencil with them as described above. “Extra” fingers will no longer prevent the baby from correctly grasping a writing object.
A child of 5 or 6 years old can be asked to throw darts to gain the correct grip. It turns out that darts is not just an exciting game, but also a kind of simulator that helps you understand the principle of holding a writing instrument.
Art crayons are another good option for teaching how to hold a pencil correctly.
First, the pastel must be broken into pieces, the length of which does not exceed three centimeters.
Children will not be able to hide such small crayons in their fist, so they will have to hold the pastel exclusively with three fingers.
After practicing with chalk, the child will be able to switch to more adult writing accessories without any problems.
If the child still does not understand how to hold a regular pen correctly, you should use the simplest technique, which involves drawing a dot on the place of the middle finger where the pencil should lie.
An interesting game method will help a very young child to hold a pencil or pen correctly, and it does not matter at all whether the child prefers a right or left grip.
They tell the baby that the pencil is tired and wants to sleep, he needs to be helped to lie down in the “bed”. A “pillow” is placed under his head and a “blanket” is covered on top.
Let’s explain: “bed” is the middle finger, “pillow” is the index finger, “blanket” is the thumb. You can even make up a fairy tale about a pencil and fingers.
The problem of teaching writing also worries manufacturers of writing accessories. In office departments, parents can purchase special attachments that are made in the shape of little animals.
These devices have special small recesses and recesses. If the rubber attachment is put on the handle, then the child simply will not be able to grasp the writing instrument incorrectly.
On the Internet you can find many positive reviews about such an accessory as a training pen for teaching correct grip. The accessory looks like a fish with special indentations. Manufacturers and parents claim that such a simulator can even correct a child’s handwriting.
Another option for educational writing devices is pens from the Stabilо LeftRight series. These devices were developed with the participation of doctors, teachers and ergonomic specialists. The triangular handles already have special attachments with indentations that help the “scribe” to grasp the item correctly.
At an early age, it is best to begin acquaintance with writing objects with a pencil, since it is easier to grasp and hold in the correct position. Then you should move on to the handle.
In order for your child to like his future school affiliation and meet all the requirements, it is necessary to take into account several important characteristics:
- the presence of a rubber insert that will prevent slipping;
- safety of the material, since the child will definitely pull the handle into his mouth;
- triangular body shape;
- The length of the product is less than 13 centimeters, and the thickness does not exceed 8 millimeters.
In order for a child to be able to hold a pen correctly while writing, he needs to take an optimal position at the table. Since ancient times, schoolchildren have been taught to observe the principle of three right angles.
The ideal landing is when a right angle is formed by bent knees, hips and back, and bent elbows.
You should also remind your child to:
- kept his legs close;
- lowered his entire feet to the floor;
- placed his hands on his desk when writing;
- maintained a 2-centimeter gap between the table top and the body;
- placed the copybook at a 30-degree angle to the body;
- bowed his head slightly towards the table.
Positioning a child's hand to write is impossible without holding the pen correctly. To prevent the child from getting tired, it is necessary to maintain a certain distance from the tip of the rod to the index finger - 1.5 centimeters.
In order for a child to be able to write correctly at 6 or 7 years old, it is necessary to improve his fine motor skills at an early and preschool age. Such exercises will help you develop beautiful handwriting and coordinate your movements.
To prepare for writing , you can do exercises such as:
- finger gymnastics;
- rolling beads between fingers;
- stringing beads or large beads on a thread;
- cutting out patterns from paper with safety scissors;
- tying and untying knots;
- sewing on buttons;
- drawing;
- performing various hatchings;
- completing patterns;
- modeling from plastic mass;
- lacing;
- fun with a constructor;
- fun with a bubble ball, etc.
Thus, the question of how to teach a child to hold a pencil or pen sooner or later arises before every parent. However, this problem can be solved quite simply, but only if you show patience and take into account the characteristics of the baby.
Source: kroha.info
Signs that your child is holding a pencil incorrectly

In addition to obvious signs - when the pencil is in the fist or the fingers are far from the writing part, there are also indirect signs that the object is not taken correctly.
- Pressing too hard on the paper.
- The thumb is below the index finger.
- When writing, the upper end of the pencil is directed not toward the shoulder, but to the side.
- The child turns the sheet of paper, but the pencil remains in one position.
- Grip with a “pinch” or “pinch” (all three fingers are at the same level).
If you notice at least one of these signs in your child, then he needs help holding a pencil correctly.
How to teach how to hold a pen correctly
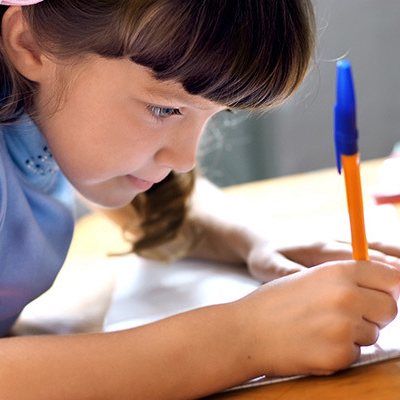
First of all, any activity should be a joy. If your child doesn’t like to draw, then don’t insist, try tracing large objects, or you can imagine that it’s a flying pencil and draw in the air. Turn any activity and learning into a game and success will follow.
It is important to teach your child to hold a pencil or pen so that the hand does not get tired when writing.
Several ways to easily teach your child how to hold a pencil correctly.
- Let your child draw with small pieces of crayons. You can't take them into your fist. Therefore, the child will hold the crayons with three fingers.
- Throwing darts. This game perfectly develops not only accuracy, but also the correct grip of writing objects. True, this is not safe for small children, so imagine that the pencil is a dart and a piece of paper is a target. As a bonus, you will get an interesting dot pattern.
- Secure the pencil to your hand with an elastic band. If a child tries to squeeze the pencil into a fist, the elastic will tighten and he will immediately feel discomfort.
- Buy your child a triangular exercise pen. In the stationery department you will find such pens for both small fingers and older children. These pens are lightweight and have three sides.
- Exercises for the correct grip of the pen when it is lying down. Ask your child to take the pen, but only the back of the pen should be facing him. For more information about this exercise, see the video below.
- Activities to develop fine motor skills. Practice modeling from plasticine or salt dough, string beads and teach your baby how to fasten buttons. All this perfectly develops the “pinch grip”.
In any training, regular exercise is necessary. To reinforce the skill, you can offer your child the following tasks:
- connecting the drawing by points;
- shade the figures;
- drawing by cells;
- outline the object.
How to choose the right writing instruments

The variety of stationery supplies sometimes confuses parents. Which pencils to choose? Which is better: felt-tip pens or colored pencils, which pens to use... Of course, children like bright and beautiful objects so much and they are ready to buy everything. But in reality, they turn out to be completely unsuitable for drawing. When choosing pencils, their softness and hardness play an important role. All this also forms the correct grip. It is better to take hard-soft pencils (TM). They allow you to draw without pressing on the pencil, which prevents the child from straining his hand. And the diameter of the writing instrument should not exceed 1 centimeter. It is advisable to use multi-edged pencils, as they do not slip in the hand.
When choosing markers or pens, opt for accessories that have a rubberized part. And remember, the sooner you start showing your child how to hold a pencil in his hand correctly, the sooner he will get used to it and you will not encounter learning problems when the child goes to school. Each lesson should be an exciting game, because kids learn only the information that interests them. There is no need to insist if the child does not want to study now.


